
Google Translate is boring. If I want to learn a language, I want all the benefits of part-of-speech tagging that we have nowadays - show me the verbs as infinitives, show me the pronounciation, get me the translation. Here's how I built that. Demo.
I've been living in Amsterdam for two months now after moving from Australia after my degree. I could go on for hours about the Dutch culture; what I've always found interesting is how it is intertwined with language. Atypically they are described as direct, in business dealings and in personal life. So direct, that the word for housemate (huisgenoten) literally translates as house enjoyer, and what you call your wife can be your echt genout, or, my "really enjoy" ❤️.
Another flavour of their culture is over their grammar - while the constructions for tenses mirror English (I will X, I have X), the words can vary their position more than a US president's stance on Syria. A sentence can be constructed where all the verbs are at the end, there are verbs such as opzoeken which contain a preposition prefix which is then separated from the verb when you're conjugating, and so on...
So, while I was lost in a Dutch film script for a 48h film project, I thought to myself - why not make this easier? Computer scientists have been developing natural language processing tools for decades, surely there must be a nicer interface to reading a language. And so, here's my Dutch Translator:
Part-of-speech (POS) tagging
Firstly, I found the one-and-only NLP framework for Dutch, Frog. Setting up Frog was as easy as pulling a Docker image (containerisation is a beautiful abstraction for this reason), which although quite large (1.2GB), included all of the datasets and process management out-of-the-box.
Frog is a part-of-speech tagger, which means it returns annotated information for a given Dutch sentence. It's important to note that it computes tags for different parts-of-speech, not words -- an example of this is the verb opzoeken, which is a 'preposition prefixed verb' I mentioned earlier. In a sentence such as "Ik ben op zoek naar een kamer vanaf 1 mei", 'op zoek' is a single part-of-speech item, despite being punctuated by space between the two words. "Op" is a preposition meaning 'on', but in this circumstance it's actually part of how you conjugate the verb.
So for the sentence above, the output from Frog would resemble this:
[
  [
    "Ik",
    "ik",
    "[ik]",
    "VNW(pers,pron,nomin,vol,1,ev)",
    "O",
    "B-NP",
    "",
    ""
  ],
  [
    "ben",
    "zijn",
    "[zijn]",
    "WW(pv,tgw,ev)",
    "O",
    "B-VP",
    "",
    ""
  ],
  [
    "op_zoek",
    "op_zoek",
    "[op]_[zoek]",
    "VZ(init)_N(soort,ev,basis,genus,stan)",
    "O_O",
    "B-PP_B-ADJP",
    "",
    ""
  ],
  ...
]
About this data - "ben" is the conjugation of "zijn" (to be), and we can tell it's a verb by it's tag, WW. There is no standard for POS tags just yet, as languages vary in their specificities, but you can usually expect categories such as adjectives, nouns, pronouns, adverbs, interjections (oh!) etc.
Designing an interface
Now I validated the data could be useful, it was time for ideating an interface. Let's delve into my old process:
- Paste a phrase into Google Translate
- Immediately gratified with the full translated sentence (bad for learning)
- Slice various words around to understand what role they have (preposition, etc.)
- Slice further to get the precise mapping between the individual Dutch and English words
- Copy the verbs and look up their infinitive on another website, to see how they're conjugated
- Press the speech button to hear the pronounciation/enunciation
Analysing this, we can see some immediate pains:
- Google Translate only translates, I want to comprehend
- There's a lot of back and forth to understand individual words
- Important information (infinitive, pronounciation) is missing
- The immediately visible translation does not challenge my comprehension.
With this in mind, I imagined my ideal user experience, as pasting a sentence, and being able to expand each word to see its relevant detail (infinitive if it's a verb, English translation). A lot of language comprehension is rooted in your intuition to guess the meaning relative to the context, so I also wanted to see the verbs/nouns/adjectives in the sentence at a glance.
Building the frontend
After briefly ideating, I started iterating on a frontend. The decision to use React was a default, however for the first time I decided to employ Redux properly. Initially I fiddled with MobX and Microsoft's Satchel.js, before realising that it was easier to reason functionally about my interface than worrying if I forgot to convert MobX's observable.array to an actual array type (since JS only supports observation on Object's). Let me clear - I am in love with the separation of concerns that Redux affords. It is by far the most efficient web development process I've had, and makes reasoning a whole lot more easier.
Tagging the sentence
Frog runs in a Docker container as a standalone server, and only has a Python API binding. To communicate from the web frontend, I wrote a small microservice using Flask which simply JSON-encoded the output. Since browser security prohibits accessing other origins (which include different ports on the same localhost), I had to setup a small HTTP proxy in conjunction with the Webpack dev server.
from flask import Flask
from flask import request, render_template, jsonify

app = Flask(__name__)

from pynlpl.clients.frogclient import FrogClient
frogclient = FrogClient('nlp', 12345)
frogclient.returnall = True

def translate(text):
    return frogclient.process(text)

@app.route("/", methods=['GET', 'POST'])
def hello():
    if request.method == 'POST':
        text = request.json['text']
        return jsonify(translate(text))
    else:
        return 'hello\n'
Sometimes the tags returned would be a null array, so I filtered this out as soon as possible in the action creator. JS one-liner: you can filter null entries from an array by using array.filter(Boolean), which uses the constructor for Boolean's as an identity function - neat!
When the sentence is pasted, the processText(text) action creator is dispatched. Redux by default only allows object returned from action creators, but here we need to first get the data before updating the UI. This is where Redux's simplicity again shines through the pattern of middleware (popularised in Express.js). The thunk middleware allows an action creator to return a function, which then can dispatch any number of actions from within it. This means our purely functional UI doesn't have to deal with the abstraction of asynchronisity.
Rendering the sentence
Rendering the sentence was made difficult by a few things:
- the POS API doesn't preserve space or newlines. I wanted to render the sentence in the same way it was inputted, as incongruence would detract significantly from the learning
- the POS API did return punctuation, despite there being no information attached to it.
- there was no index information attached to each word, so it was impossible to simply
.replaceit in the original string
This might as well be a coding interview problem, because it did take a bit of head-wrapping to solve. Problem: render the original sentence with all punctuation and spacing, but render all tagged words using the custom component. I hacked something procedurally which worked, but the functional solution once again came out on top.
The code is included below. The algorithm makes use of the fact that the order of words is preserved. For each word, we find it's index in the original text, and the substring between the end index of the previous word bufstart and the index of the current word is the punctuation/spacing! It's also important that we print the remaining space at the end of the string (because it might end in a !, which we all know isn't a word).
let annotation = [];
let text = this.props.text;
let words = this.props.words;

let bufstart = 0;

words.map((word, i) => {
    if(!/[a-zA-Z0-9]+/.test(word.word)) return null;

    let buf = text.substring(bufstart, text.length);
    let wordstart = buf.indexOf(word.word)

    let punctuationEtc = buf.substring(0, wordstart)

    annotation = annotation.concat([
        <Whatever key={i + punctuationEtc}>{punctuationEtc}</Whatever>,
        <Word key={i + word} onClick={() => this.props.toggleExpandWord(i, word)} {...word} />
    ])

    bufstart += wordstart + word.word.length;
})

let lastPunc = text.substring(bufstart, text.length);
annotation = annotation.concat([
    <Whatever key={words.length+1 + lastPunc}>{lastPunc}</Whatever>,
])

return annotation
Adding interaction
Now the sentence is rendered, it was time to make it interactive. My sole interaction was clicking and expanding each word.
Rather than incorporating the information mid-sentence, I wanted to display it below the word, so that it was clear there were two flows of comprehension: the Dutch (above) and the English (below).
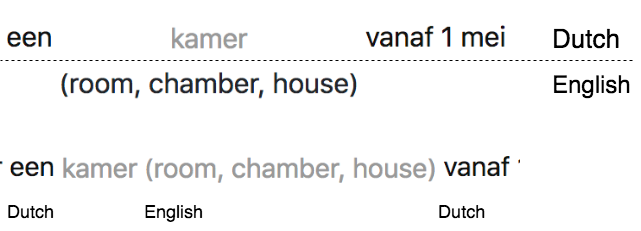
In addition, I wanted to incorporate motion design. It was important the word expanded with the Dutch translation remaining centred (again, reducing cognitive strain on reading) while the translation below expanded the available space.
Animating width and height is difficult in CSS. To start, because of the way the box model works in web layouts, the translation .details element needed to remain in the DOM so I could animate it's expanding width, however it couldn't take any space otherwise it would disrupt the layout of the sentence. The flow ended up being:
- Default:
display: none;(width=0) - Animation Enter:
display: block; max-width: 0;(width is now computed, but the element still takes up no space) - Animation Enter Active:
max-width:500px(500 is arbitrary, the point is that CSS can only animate max-width, and so in setting it to a large value we are effectively beginning the animation).
In CSS:
.details {
    transition: all 500ms;
    transition-timing-function: cubic-bezier(0.65, 0.05, 0.36, 1);

    pointer-events: none;

    max-width: 0px;
    max-height: 0px;
    opacity: 0;
}

.viagra-enter .details {
    display: block;
}

.viagra-enter-done .details {
    display: block;
    transition: all 500ms, opacity 250ms;
    visibility: visible;
    max-width: 500px;
    max-height: 500px;
    opacity: 1;
}

.viagra-exit .details {
    visibility: hidden;
}

.viagra-exit-done {
    display: none;
}
Translating each word
I needed a translation of each word. To do this, I used the wonderful Globse API to translate to English.
The problem with translating individual words is - they can have different meanings! To solve this, I incorporated another POS tagging library, but this time for English words. I wrote a rough lookup table from the English tags to the Dutch tags, and then scored each possible translation based on how many tags it matched for the original Dutch word. Sorting this, I was able to cheaply get the translation and cache it.
meanings = meanings
.map(enWord => {
    let tags = new Tag([enWord]).initial().tags;
    let score = 0;

    tags.map((enTag, i) => {
        let nlcode = en2nlCodeMapping[enTag]
        if(word.typ == nlcode) {
            score++;
        }
    })

    return {
        word: enWord,
        score,
    }
})

meanings = _.sortBy(meanings, x => -x.score).map(x => x.word)
Pro-tip: rather than messing around with JS syntax, you can do cheap text processing to have a more malleable data structure that's amenable to editing.
`
ADJ = JJR JJS
BW = RBR RBS WRB
LID = DT PDT WDT
N = NNS NNP PRP PRP$ WP
SPEC = FW
TSW = UH
WW = VB VBP VBZ VBG VBD VBN MD RB RBR RBS
VZ = IN TO
VNW = PRP PRP$ WP
VG = CC
`.split('\n')
.filter(line => line != '')
.map(line => {
    let [dutchCode, enCodes] = line.split(' = ')
    enCodes.split(' ').map(code => {
        en2nlCodeMapping[code] = dutchCode
    })
})
Adding filters
Filters were the last part of my exercise. I used the wonderful d3-scale library to generate colours from POS categories. I made a rough mapping of four categories, rather than using the exact POS types.

Filters were particularly easy to implement in Redux. Here's how the reducer looks:
export const FILTERS = {
    'verbs': {
        shown: false,
        typs: ['WW', 'BW']
    },
    'adjectives': {
        shown: false,
        typs: ['ADJ']
    },
    'nouns': {
        shown: false,
        typs: ['N', 'SPEC']
    },
    'prepositions': {
        shown: false,
        typs: 'VZ TSW TW VG'.split(' ')
    },
    'pronouns': {
        shown: false,
        typs: ['VNW'],
    }
}

function wordFilters(state = FILTERS, action) {
    switch(action.type) {
        case 'TOGGLE_WORD_FILTER':
            let filter = state[action.filterName];

            return Object.assign({}, state, {
                [action.filterName]: Object.assign({}, filter, {
                    shown: !filter.shown
                })
            })
        default:
            return state
    }
}
Another advantage of using Redux instead of your own state management in React, is that 'connecting' components to the state tree is much easier. The filter substate is used in two components, <FiltersView/> and <Word>. We need to render the filters and apply their colour if they're active, and also apply the colour to each word if its filter is active.
Redux enables this through a connector, which effectively wraps the component with two helpers that assign properties:
- mapStateToProps: this literally assigns state from the store directly to the component.
- mapDispatchToProps: this is the intermediary between action creators and component interaction.
// FiltersView.js

const mapStateToProps = state => {
    return {
        filters: state.wordFilters
    }
}

const mapDispatchToProps = dispatch => {
    return {
        toggleFilter: filterName => {
            dispatch(toggleWordFilter(filterName))
        }
    }
}

export default connect(
    mapStateToProps,
    mapDispatchToProps,
)(FiltersView)
// Word.js
const mapStateToProps = state => {
    return {
        filters: state.wordFilters
    }
}

export default connect(
    mapStateToProps,
    null,
)(Word)
The state tree doesn't always exactly match what you're rendering though. In these cases, a little bit of functional programming goes a long way:
function colorWordForFilter(filters, typ) {
    let enabledTyps =
        _.values(filters)
        .filter(filter => filter.shown)
        .reduce((acc, filter) => acc.concat(filter.typs), [])
    if(!_.contains(enabledTyps, typ)) return null;

    let colour = typeCodeToColour(typ)
    return {
        backgroundColor: colour,
        color: "white"
    }
}
Using reduce, we can create an array of POS types from each enabled filter, and then it's as simple as checking if this word's type is filtered or not.
Packaging it all up with Docker
The final step of this experience was deployment, which is always a pain. I use Docker Compose to contain each service and their port bindings, and then hook them all up. The NLP server takes a gobsmacking large amount of RAM (900MB+), but this was easily ameliorated with a bigass 4GB swapfile. Webpack-dev-server didn't seem to know "if it was arthur or martha", and kept throwing Content-Length Mismatch errors with respect to the JS bundle. I opted instead for using Nginx in production, which also improved the proxying speed to the backend.
version: '2'

services:
  web:
    image: 'jmfirth/webpack'
    command: "sh -c 'yarn; node_modules/.bin/webpack --config webpack.prod.config.js -p'"
    working_dir: /src
    volumes:
      - ./:/src
      - ./static:/src/static
    environment:
      NODE_ENV: 'production'

  nginx:
    image: nginx:alpine
    volumes:
      - ./nginx/:/etc/nginx/conf.d/
      - ./static:/etc/nginx/html/
    ports:
      - 3000:80

  nlp:
    image: 'proycon/lamachine:latest'
    command: 'frog -S 12345'
    expose:
      - 12345

  flask:
    image: 'python:3'
    command: ["./wait-for.sh", "nlp:12345", "--", "./run.sh"]
    working_dir: /flask
    volumes:
      - ./flask:/flask
    environment:
     FLASK_APP: "app.py"
     SERVER_NAME: "0.0.0.0:5000"
    expose:
     - 5000
One important learning here was that for personal projects, you don't need to explicitely contain every service. The idea behind services is that they can be scaled, restarted, and so on with no downtime, which oftentimes is not needed. Iterating on Docker containers takes by far the longest time, and definitely warrants further investigation.